review

Need a spare 35mm M-mount lens

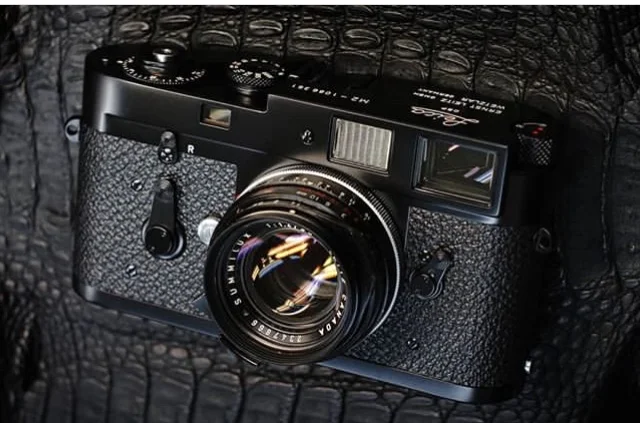
I have my everyday M2 with a v2 35mm Summicron.

Works great -

About a year ago I picked up a second beater M2 for a relatively good price. The idea was to have a spare camera when my main one is going in for repair. I used to hate switching to a complete different system for 2-3 months while my Leica was being serviced. You might say this doesn’t happen to often anyhow; I say, when it does it sucks. 2-3 months is a long time. I carry my camera everyday and while Leica’s are tough cameras, they do break.

Anyhow, having a spare body is no good if I don’t have a spare lens.

So I’ve been thinking what to get for the second body. I like the Summicrons, but I don’t want to spend that kind of money on a ‘spare’ lens… but then I like them…

I considered the following lenses:

  1. 35mm Summicron v1:

    1. Built quality and looks are great

    2. Price is just crazy. $5000+ for a lens from the 60s that probably needs repair

    3. don’t like the infinity focus lock

    4. don’t like the softness

    5. don’t like the flare

  2. 35mm Summicron v2:

    1. this is what I have now, would be great to get another one, but boring and also not exactly cheap at around $2000

  3. 35mm Summicron v3:

    1. same as v2 but different focus ring and made in Canada. I love this lens, but it’s basically the same as v2

  4. 35mm Summicron v4:

    1. nice and small

    2. don’t like the plastic hood

    3. don’t like the new square font (doesn’t work with the M2 old font)

    4. don’t like the focus ring

    5. had it before, and hated the flare. Actually thought it was broken and tried to return it. that’s how bad the flare is compared to a Zeiss Biogon 35mm

  5. ASPH v1 and v2:

    1. too clinical pictures for my taste

    2. too expensive

    3. WAY too big, especially the newest one

    4. much heavier

    5. plastic hood on v1, plastic focus tab (for that money???)

  6. Zeiss Biogon 35mm f/2.8:

    1. I shot this lens for over a year about 5 years ago. It was great! I sold it because people on the internet got into my head and I thought I need an extra stop of light. Can’t have non-Leica glass on a Leica camera.

    2. This lens was so good, I actually tried returning my Summicron. I thought it was broken. The Biogon has no flare whatsoever. It’s sharp as hell and yet pictures taken with it don’t look as clinical as the new Summicron Aspherical photos do.

    3. It costs $650 NEW!!! that’s insane!

    4. don’t like the third aperture stops and the 43mm filter threads. That’s really unfortunate.

    5. built quality is amazing. the focus is smooth but feels different than a Leica

    6. Leica die hards will look down on you

    7. This lens is amazing. I don’t care what people say. I am getting one now.

Leica M6 to MP to M2

My old Leica MP after having the skin replaced with something grippier than the factory MP shark skin.

My old Leica MP after having the skin replaced with something grippier than the factory MP shark skin.

I bought my first Leica when I got tired of my Ricoh Gr1v breaking. Repair was so expensive and Ricoh stopped accepting repairs about 5-7 years ago. The M6 was so hyped up on the internet that I didn’t even look at anything else. Got one and liked it a lot actually. Then I learned about the MP and thought how nice it would be to have a more pure one with a metal rewind lever and brass plates instead of zinc. OK, sold the M6 and got an MP now. That one I actually shot from 2014 - now (2019). Never had an issue with it other than a dirty viewfinder or a few loose screws (lol). All easy to fix.

But in January 2019 I got my CFA exam results back and passed. I spent the past half year in my room studying after work until I went to sleep and only shot photos in the morning on my way to work. I was so happy to have passed the exam and rewarded myself with an M2! 

It’s been a dream of mine to buy an old M2 and have it completely rebuilt/refurbished by Kanto Camera. They guys do a great job but it’s not cheap and it takes forever.  

I had mine completely overhauled and painted black. It costs me ¥190,000 and took 5 ½ months...

Thats a lot of time and money. Whether that’s worth it or not depends on your budget and how much you shoot. I use my camera everyday. For me it was worth having a camera I really like using.

M2 when I dropped off for the overhaul.

M2 when I dropped off for the overhaul.

FullSizeRender.jpg


I’ve been a Kanto customer before. Had my MP skin replaced there and my Summicron v4 35mm overhauled. I knew it would be expensive and take time but I also knew that the work they do is second to none. I spoke to Kanto about the project before I bought the M2. I told them what type of M2 I like. The lever rewind and self-timer bodies are my favorites. I don’t plan on using the self-timer but it can act as a nice grip.

Kanto also recommended getting one with a serial number over 1 050 000. I am not exactly sure I understood why, but it was something about the viewfinder. If the finder is bad it’s easier for them to fix it or replace it. The one I found was 1 086 XXX.

It worked fine before I dropped it off. The only thing I didn’t like was the lens mount didn’t click loud enough when mounting a lens. It definitely locked securely but didn’t make the assuring sound the MP made. Anyhow, Kanto said they would try to do their best to fix that. Unfortunately it didn't change that much, even after the overhaul.

New shutter curtains for my M2

New shutter curtains for my M2

Five months after dropping it off they started working on it. Overhaul at Kanto means they take the camera apart completely. Everything that can be taken apart is taken apart, cleaned lubricated and if necessary replaced with a donor part. Kanto told me they even manufacture certain parts that are hard to come by as donor parts in-house.

Matte black paint with off-white engravings

Matte black paint with off-white engravings

Once they started working on it, it took about 3-4 weeks. They stripped the chromed silver off the top and bottom plates, removed the old leatherette and replaced the shutter curtains.

There are tons of options to choose from when you go in for a custom paint job. I didn’t even bother looking at the ridiculous pink and red stuff. My choices were between olive drab, Luftwaffe blue/grey or black. I ended up picking black because they other two options leave the dials and levers silver. I wanted an all black camera, but even within that you have 3-4 different blacks you can choose from. The original black paint M2 bodies were a shiny black paint. I didn’t like that as much. I wanted something that matches the matte, toned down black of the summicron lens I was gonna put on it.

Then they ask you about the color of the engravings and even lugs. Lugs are actually also replaced by default unless you ask them to keep the original ones. For the top plate and dial engravings I picked an off-white. They even offer pre-brassing to make the camera look less factory-new but that was just too ridiculous. Who would pay almost 2,000 USD for a paint job and then ask the same people to take part of it off again before returning it to you. That seemed borderline crazy to me, but check their Instagram feed. About half of their customers do exactly that. I’ll see how long it’ll take for mine to brass naturally. All I can say now is that the paint feels extremely strong. I don’t see this coming off anytime soon.

The shutter release is smooth like butter on the M2. My MP was nice and smooth but nothing even close to the M2. The shutter speed dial was a little stiff when I picked the camera up.I told them about it and they adjusted that on the spot for me. So far I am happy with the camera. The “no meter” thing didn’t take nearly as long as expected. The only thing that bothers me is that the back door has a tiny little play. It shifts left/right if you push it. There are no light leaks and it works flawlessly but I’ll see what they can do about that when go there next time. I highly recommend Kanto Camera. They have fixed lenses for me that other places couldn’t fix or wouldn’t even accept. With this custom paint they surprised me again. The camera feels and looks brand new. I really want to support Leica with their current film bodies, but I just couldn’t resist getting one of these classics.

1963 Leica M2 all done! Complete overhaul, repaint and reskin. New shutter curtains. Basically a brand new camera.

1963 Leica M2 all done! Complete overhaul, repaint and reskin. New shutter curtains. Basically a brand new camera.

TMax P3200 vs Delta 3200

TMax P3200 scanned negative  

TMax P3200 scanned negative  

Early 2018 I was going through some rough time and Kodak’s, out of the blue, announcement of the resurrection of TMax P3200 was just what I needed to cheer me up. 

I’ve more of less settled on Tri-X for most situations and rate Tri-X at 400 and shoot it with a yellow-green filter. Effectively that make it a 250 ISO film for me. Sometimes, 250 iso just doesn’t cut it and that’s when I used Delta 3200. An interesting film with lots of grain. A little too flat for my taste but I had to work with it. I figured out how to make it work for me but never really liked it as much as Tri-X. Delta 3200 is an extremely flat film. Super low contrast and HUGE grain. Some people prefer pushing Tri-X instead but pushing film makes for difficult to print negatives. If you only scan your film this will not be a drawback for you. For me it is, hence I opted for a faster film when I needed speed.

Delta3200 scanned image.  

Delta3200 scanned image.  

Ilford recommends Delta 3200 at EI 3200 to be developed in Microphen ​Stock 1:1 for 9:00 minutes. I’ve tried that and got incredibly flat and boring results. I kept on increasing development time until I got to a contrast level that I liked. At 20:00 minutes, more than twice the recommended time, I was semi-satisfied. The grain however was horrifying. I like grain but this film is really grainy. 

Delta 3200 scanned image

Delta 3200 scanned image

When Kodak announces the return of TMax P3200 I was pleasantly surprised. I got back into film in 2013, one year after Kodak discontinued P3200. Since I never had a chance to compare the two films I jumped on it.

I ordered 20 rolls from B&H and shot test rolls in T-Max and xtol developers. I didn’t like it in TMax developer but that wasn’t a surprise. I’ve tried that developer before with Tri-X and Delta 3200 and never liked it. It blows out highlights too fast and makes for weird grain to my eyes. In Xtol 1:1 I got results I really liked. The grain is pronounced as you would expect from a film this fast. However, the grain structure was very pleasing and unobtrusive. The tones looked better than Delta 3200, too. In terms of speed I think Delta wins. I know neither one of these films is a true 3200 ISO film but I can get great results at 2000ISO or maybe 2500ISO with P3200. The Delta film I have to shoot at 3200 and massively over develop to get some contrast into the negs. 

As I shoot 35mm almost exclusively TMax P3200 is the clear winner. It’s a dollar cheaper per roll, Xtol is a fraction of any of the Ilford Developers and the film is sharper and less grainy than Delta. Hands down, TMax wins.  

TMax P3200 printed on MCC110 paper.  

TMax P3200 printed on MCC110 paper.  

Fujifilm Acros 100 in D76 1+1

Been wanting to shoot more B&W film this summer. I recently gave Silvermax a try but somehow that didn't work for me. I'm sure it would've if I gave it a bit more thought or tried their dedicated developer. But! Silvermax is not readily available in Japan. There's only one online retailer in Japan that sells this film and it's out of stock right now. It's summer and I wanna shoot. So this didn't work for me and I decided to give Acros a try. 

Acros is readily available in Japan and it's cheap (585 yen/roll) . I know Fuji recently announced the discontinuation of Acros but it is still available now. 

I decided to just stick to D-76 1+1 for my developer. I expect to shoot this film only in harsh contrast on sunny days anyways.  

Basic Test: 

  1.  Find rough developing time
  2. Shoot test shoots at different EI
  3. enlarge test shoots onto paper and pick best one.  


bracketed test roll exposed at different EI settings for N, +3, -4. We are looking for a set of the frames where the -4 exposure barely starts producing density on the film. The +3 exposure should be nearly black. Anything greyish here would mean un…

bracketed test roll exposed at different EI settings for N, +3, -4. We are looking for a set of the frames where the -4 exposure barely starts producing density on the film. The +3 exposure should be nearly black. Anything greyish here would mean underdevelopment and probably a low contrast final photo. 

blank piece of film enlarged onto paper to determine min time for max blacks. 2s, 4s, 6s, 8s, 12s etc. Around 12 seconds we're reached max black. Longer exposure will not give deeper blacks. This means that exposing my negatives onto this paper for …

blank piece of film enlarged onto paper to determine min time for max blacks. 2s, 4s, 6s, 8s, 12s etc. Around 12 seconds we're reached max black. Longer exposure will not give deeper blacks. This means that exposing my negatives onto this paper for 12 seconds should be enough to give nice deep blacks.  

meter at 100 ISO, +3 stops over exposed frame enlarged onto paper to determine dev time. top: 11'15", center: 10'30", bottom 12'30". Here we are exposing the near black super dense negative onto paper. Right half is covered up completely and hence p…

meter at 100 ISO, +3 stops over exposed frame enlarged onto paper to determine dev time. top: 11'15", center: 10'30", bottom 12'30". Here we are exposing the near black super dense negative onto paper. Right half is covered up completely and hence purest white the paper will produce. The left side is the dense negative at 12 seconds. This should be dense enough to barely produce any tone onto the paper. Just a shade away from white is what we are looking for. Anything darker here would mean low contrast final results. 

bracketed shots at 150ISO, 100, 75, 50, 32, 25 top to bottom, left to right. All exposed at min time for max blacks (12 sec here) with grade 2 filter. These pictures prove the theory. Too dark means underexposed. Too dense highlights mean too m…

bracketed shots at 150ISO, 100, 75, 50, 32, 25 top to bottom, left to right. All exposed at min time for max blacks (12 sec here) with grade 2 filter. These pictures prove the theory. Too dark means underexposed. Too dense highlights mean too much development. 

As you can see from the above tests, this film works best at an exposure beteeen 75-100 ISO.  At 100 the final print is too dark. At 75 I get prints that don’t look dark anymore and at 12:30 mins developing time I get nice contrasty highlights without the need to burn anything in. 

This film is very fine grained in D76 1+1. Maybe a little too fine grained for my taste. I usually only print on 5x7 and at this size the film just looks too clean. For bigger enlargements it is probably a nice choice. If that works for you I highly recommend this film. Get it while you can. Fuji stopped making B&W films and it’s only a matter of time until the current stock runs out. This is the end of a long era. Fuji Neopan films were superb!

Adox Silvermax in D76 1+1

We're in the middle of the raining season here in Tokyo, which means summer is around the corner. I was thinking I'll shoot some more b&w film this summer and wanted to test a few 100 ISO rated films for those really bright days. I almost always shoot with a yellow or orange filter, but even with that my usual Tri-X is just too fast for a day in the sun. So I tried out a few 100 speed films that I had lying around still. Fomapan 100, Ilford Delta 100 and Adox Silvermax.

I am going to review the Silvermax here and the other two in a follow up post. I didn't want to mess with too many developers, so I decided to soup them all in D-76 1+1, same formula I use for Tri-X. Since I print a lot of my negatives in the darkroom I do appreciate an easy to print negative. For people who only scan their film this may not be worth reading at all. 

I shot a test (half-roll) setting my cameras meter to an ISO, then shot one normal exposure, one +3 stops over, one -4 stops under.

Daylight scene: (100, +3, -4), (200, +3, -4), (50, +3, -4)

Grey surface: (100, +3, -4), (200, +3, -4), (50, +3, -4)

The film was developed in D-76 1+1 at 20 degrees for 11:00. 

I judge my personal film speed from the shots of the grey surface. At -4 stops I should see some density starting to build up. The first set, shot at 100, +3, -4 has basically no density at the -4 bracket (frame 29). Over to the 200, +3, -4 set. Frame 35 above is basically clear film base, so this is not it either. Over to the 50iso set.  The -4 frame has a decent amount of density showing up. Maybe even a bit too much for my taste. I like my shadows! So I am guessing that for my developing technique with my tanks and my water and my agitation and my room temperature etc. this film's speed for my taste is somewhere between 50- 100 ISO. Let's say 64ISO.

To confirm, I expose the corresponding frame of the daylight scene (frame 17) onto paper. I do this using minimum time to get maximum blacks. If the print is to dark that means I was wrong and the frame is underexposed. If it's too bright I was wrong and the frame was either overexposed or over developed. In my case frame 17 actually prints OK, but with very low contrast. I can increase the development time to get denser highlights and increase the contrast. (or mess with the contrast setting on the enlarger, but the goal is to get an easy to print negative) Increasing dev time unfortunately does almost nothing to the shadows, hence no change in film speed here. I could keep trying to change the dev time until I get the contrast I want or just use the Silvermax developer they offer, but I decided not to. 64ISO is a little bit on the slow side for my taste. I was looking for true 100ISO and actually found that in Delta 100. I'll review that in a future post.

Adox Silvermax is still a fine film. In D-76 1+1 it exhibits extremely fine grain. By increasing the development time by 20% it will probably have good contrast too. The film has a very clear base, no tint whatsoever, which makes it easy to print or maybe even reverse develop into slides. The only thing that slightly bothered me is that Adox seems to use a half frame perforator to print the edge marking. Not a big deal, but I am used to the proper 36 exposure codes of Ilford and Kodak. Foma also uses half frame markings. Interesting choice, considering there's very few people shooting half frames.


** So reading Kodak's D-76 tech sheet it seems that you need at least 237ml of stock D-76 for each 135-36 roll of film. At 1+1 in 300ml I only have 150ml. According to Kodak I either increase the development time or the tank size. That explains the underexposed negatives above.  

Saul Leiter: A Retrospective in Tokyo

So while shooting in Shibuya last weekend I passed by one of the Daikokuya shops in the red light district. It's a place that among many other things resells tickets. I usually don't pay much attention to what they have, but something caught my eye. I saw the words ソール ライター (Saul Leiter in Japanese) on one of the flyers they had posted outside. Amazing, I thought. The amount of information we actually process unconsciously... anyhow I checked it out online. It turns out this is the first time ever to have Saul Leiter's work exhibited in Japan. I am a pretty big fan of his and already have one of his color books. I went back and immediately got tickets and went the same day. 

I initially intended to record a video of the exhibition, but sure enough they didn't allow any cameras inside. 

The show starts with his black and white work he shot mostly for Harper's Bazaar. All the black and whites were silver gelatin prints ranging from at least 20x24 to 5x7 prints. All of them amazing. I don't know who made the prints or how old they are but they look fantastic. The show then moves into his color work. All chromogenic prints except for one cibachrome print I spotted. They were all originals, no reproductions of prints. One small part of the show showed some of his paintings. I have to say I was the least impressed with them, but I am not much into paintings and maybe other people would find that interesting. I know to him it was a big deal and probably what made him such a good photographer.

I was also able to pick up a few postcards and a book of the pictures from the show. See pics below. It really is different seeing all his work in person with your eyes instead of looking at scans of photos of photos online. If you're in Tokyo and interested in photography I highly highly recommend going there. The tickets can still be purchased at the entrance for a slightly higher price (1400 yen) and the show is on until June 25th, 2017.

Enjoy!


FullSizeRender.jpg

Artisan & Artist Review

Artisian & Artist is a Japanese company that makes camera bags and camera straps. According to their website they provide "a wide range of high quality camera accessories". 

I've had three of their straps now.  

The ACAM-103N wide fabric strap. The ACAM-262 leather strap and the ACAM-310N silk cord. 

I mostly bought them because stores here in Tokyo were pushing them as "superior quality" straps. They all cost over a 100 USD and look beautiful. That is when you but them they look impressive. The packaging and presentation is awesome, but so far not one of them has lasted over a year. Every single one of them had threads at the ring attachment slowly dissolve and come off.

Read More

Expired Black & White Film

Once in a while when I get tired of shooting in the city I take a day trip or weekend trip to the Inaka (countryside) to shoot landscape or random stuff in old towns. On my trips out there I noticed all the expired film they had in the stores. In the 90s and early 2000s basically every store was selling film. Flower shops, supermarkets, convenience stores and of course camera stores. When I saw Neopan 400 on the shelves, long after it was already discontinued, I asked them how much it was. They gave me all the rolls they had for free!

After that, every every time I saw a "Fujicolor" sign outside of a store I just asked them if they had black and white film for sale. Long story short, every time I asked I got a bunch of free Neopan 400. In Japan it's called Presto 400. The oldest rolls expired in 2006. The best ones are expiring sometime now. I wasn't sure how to shoot or develop them but gave it a shot anyhow.

Read More

Olympus XA2 vs Leica MP + Summicron !

Both take 35mm film, both have 35mm lenses. Both take SR44 batteries, both have a meter, both are  manually wound, both are black, both are ....

Ok, there are a few differences. f/2 vs f/3.5 lens. Manual aperture & shutter speed vs automatic aperture & shutter speed. Manual focus vs zone focus. One is made out of brass and basically indestructible the other is basically cheap metal and plastic. Oh yeah, and the Olympus costs about 1 % of what the Leica will cost you.

Can you tell the difference?

Read More

Latest digital experience.

Last Sunday I met up with a friend who just bought a SONY A7r ii. 

I haven't been following news and rumor sites for almost two years now. Once in a while I see stuff pop up on youtube or facebook. It seems that manufacturers are releasing the same cameras with minor changes every year if not more often. It's really mind boggling how people keep buying these things. A7r ii is one of the latest and most interesting releases in the digital camera market. So I had a 10 minute go at it.

It feels great in hand and looks pretty neat. My sample had a 55mm 1. something lens on it. The first thing that shocked me was the electronic viewfinder. I picked it up, peaked through it and everything looked like you're looking at a video game version of the world. According to my friend and numerous reviews online, this is the best EVF on the market right now. I guess EVFs have far ways to go if they will ever be a competition to bright DSLR viewfinders. 

Next I had a go at shooting some people on the street passing by while I was sitting outside of Starbucks having a coffee. People passing by were almost always between 2-3 meters away from me. It was a nice sunny day so I set the aperture to f8 and wanted to focus to 2.5 meters... but you can't! the lens doesn't have any focal range markings. You have to either auto focus for every single shot (which obviously makes the shutter lag even worse) or use focus peaking to manually focus. While focus peaking works, but is not easy, you have no idea if you're focus is still spot on after a few shots. The lens has no markings whatsoever. Looking at the lens you have no idea whether the focus wheel has turned or not.

Every time you take a shot the EVF blacks out and takes a short but very noticeable amount of time before you can have a go at your next shot. 3 years ago I owned a Nikon D600, which beats any of these mirrorless cameras by leaps and bounds. The viewfinder was crystal clear, bright and beautiful. Like any SLR it blacks out at the moment you fire a shot, but it's only for the duration of the shutter speed. Almost all lenses for the F mount had focal distance scales marked on them.  It looks like DSLRs will dominate for a long time to come.